JapanQuest
Official user manual

JapanQuestCreator User Manual

From registration to applications, posts, and reporting

Document version 1.1

Last updated 2026-08-04

English

On this page

Red numbers mark controls in a screenshot. Match each number to the explanation beside or below it.

  1. 1. Getting started
  2. 01Sign in, choose a role, and register
  3. 02Identity, business verification, and safe use
  4. 2. Shared operations
  5. 03Notifications, chat, and schedule messages
  6. 04Settings, language, and account management
  7. 4. Creator journey
  8. 05Find and compare campaigns
  9. 06Apply to a campaign
  10. 07After selection: chat, schedule, and visit
  11. 08Submit posts, report results, and track payment
  12. 09Profile, social accounts, Creator Kit, and quests
  13. 5. FAQ and troubleshooting
  14. 10Frequently asked questions
  15. 11Troubleshooting

How to read this manual

01Steps

Read each chapter in order: Before you start, Steps, Completion signal, Screen guide, then Checklist.

02Screen guide

Red numbers mark controls in a screenshot. Match each number to the explanation beside or below it.

03Checklist

After the task, compare the completion signal and checklist. Return to the relevant step for any gap.

01 · Shared

Sign in, choose a role, and register

Complete your first sign-in, register as a company or creator, and reach the correct home screen.

Before you start

  • Have an email address or one of the social sign-in methods shown on screen ready.
  • Companies need business and contact details; creators need a display name and location.

Steps

  1. 1

    Choose a sign-in method

    Select an available social sign-in method and finish authentication. Available methods can vary by device and service settings.

  2. 2

    Confirm the display language

    Use the language menu to switch among Japanese, English, Korean, and Chinese. You can change it later in Settings.

  3. 3

    Select one role

    Choose Company to publish and manage opportunities, or Creator to find and apply to them. This choice sets your account journey.

  4. 4

    Enter required details

    Resolve missing or invalid fields before submitting. Use the same phone and address details that you will use for verification.

  5. 5

    Read and accept required documents

    Open and review the Terms, Privacy Policy, third-party data provision, cross-border processing, electronic delivery and logs, role rules, and company direct-payment documents before accepting each required item.

  6. 6

    Review your setup tasks

    After registration, follow the setup card for profile, phone, document, and social-account tasks that are not yet complete.

UI

Screen guide

Screens use test data for explanation. Labels may differ by app version and account state.
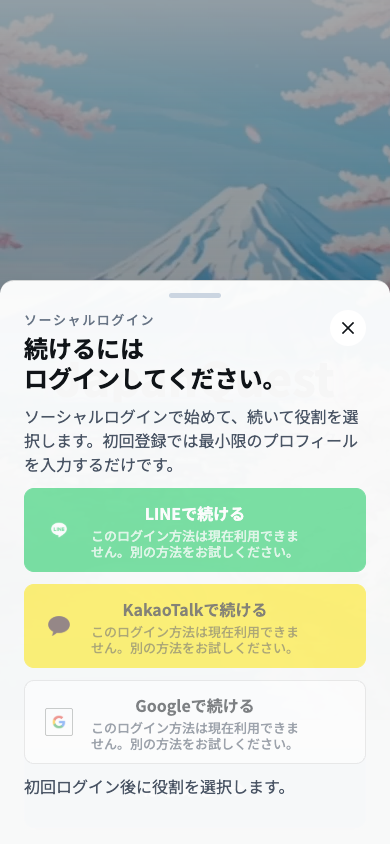
Choose a sign-in method
  1. 1Authentication panelChoose the account used for authentication, then use the same sign-in method on future visits.
  2. 2Available social sign-inSelect one of the methods shown and complete the provider's authentication screen.
  3. 3Pre-use notice and supportIf you cannot continue, note the error and time, then use the support route shown here.
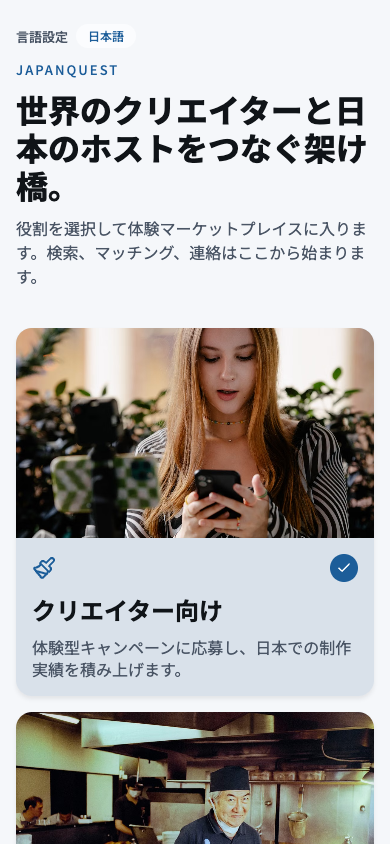
Choose role and language
  1. 1Display languageChoose the interface language before registration. You can change it later in Settings.
  2. 2Register as creatorChoose Creator to find campaigns, apply, publish content, and submit results.
  3. 3Register as companyChoose Company to create campaigns and manage applicants, deliverables, and billing.
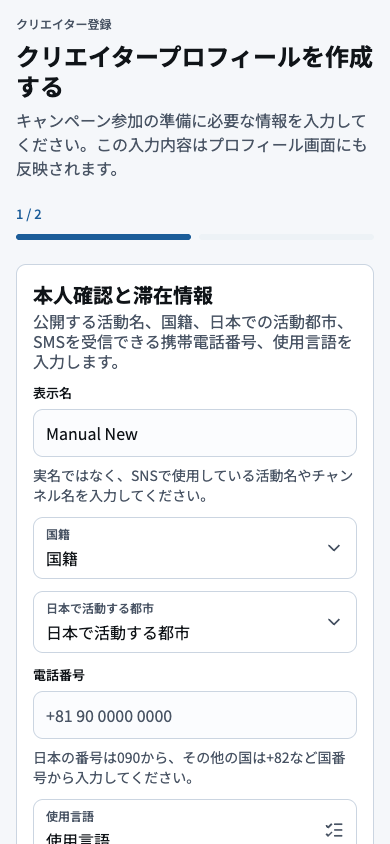
Creator registration
  1. 1Display and basic detailsEnter the display name and basic details companies will see, checking spelling and consistency.
  2. 2Nationality and locationSelect nationality and current area of residence; these can affect campaign eligibility and travel.
  3. 3Contact detailsUse a reachable phone number and email that match the information used for verification.
  4. 4Language and submitConfirm supported languages and required consents, then submit only when no required field is missing.
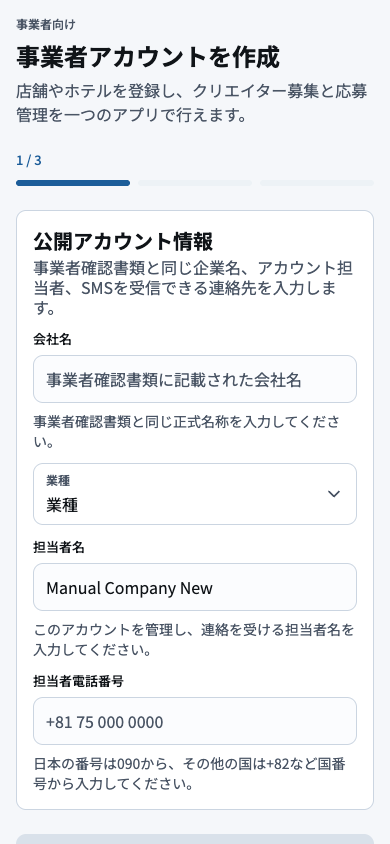
Company registration
  1. 1Company and contactEnter the public company name and operator, matching the names used for billing and verification.
  2. 2LocationEnter the registered or operating address accurately, including building and unit details.
  3. 3Contact detailsRegister a phone number and email monitored by the operator, and update them when ownership changes.
  4. 4Business details and submitReview business details and required consents before completing registration.

You are done when

Your company dashboard or creator home appears and your registration details are saved in Settings.

Checklist

  • The correct role is selected
  • Names and phone number are accurate
  • The preferred language is active
02 · Shared

Identity, business verification, and safe use

Complete the checks required for applications or company operations and protect sensitive information.

Before you start

  • Update the name, company name, and phone number in your profile.
  • Prepare a valid verification document on your device.

Steps

  1. 1

    Open Verification

    Open Verification from Settings to see progress and the tasks required for your intended action.

  2. 2

    Verify your phone

    Enter the six-digit SMS code sent to the saved number. Never disclose it to support, a company, or another person.

  3. 3

    Submit a document

    Companies submit business documents; creators submit identity documents. PDF, JPEG, PNG, HEIC, and HEIF files up to 15 MB are supported.

  4. 4

    Connect a social account

    Creators connect the social account they will use. If direct connection is unavailable, register the public profile URL manually.

  5. 5

    Follow the status

    Follow the displayed ready, pending, approved, or resubmission state. If asked to resubmit, correct only the stated issue.

UI

Screen guide

Screens use test data for explanation. Labels may differ by app version and account state.

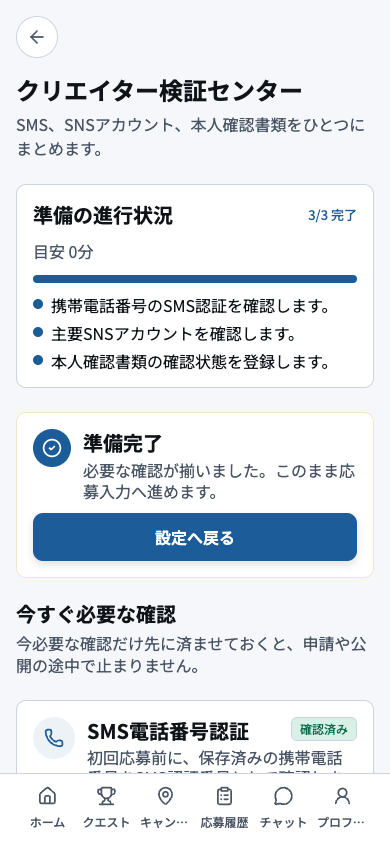
Creator verification progress
  1. 1Overall progressUse completed and remaining counts to estimate what must be done before applying.
  2. 2Application readinessCheck whether applications are currently enabled and which requirement is blocking readiness.
  3. 3Required checksComplete outstanding phone, identity, profile, and social checks from the top down.
  4. 4Task actionsOpen each action to submit or correct it, then return and confirm the status changed.
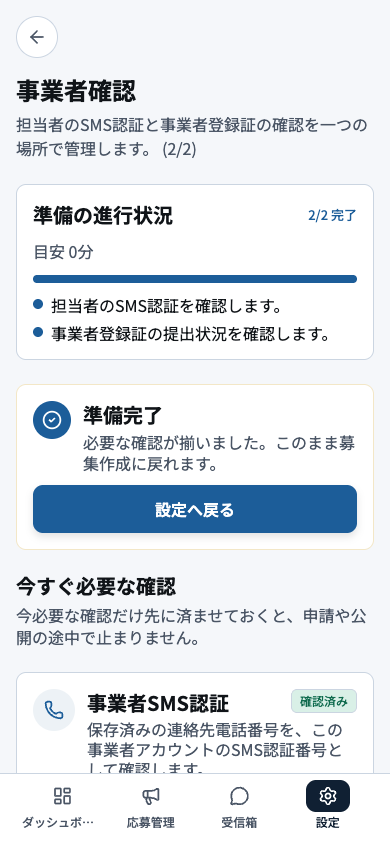
Company verification progress
  1. 1Overall progressReview setup progress and assign any unfinished requirement to the responsible operator.
  2. 2Operating readinessCheck whether campaign operations are enabled and whether a requirement is blocking publication.
  3. 3Phone and document tasksOpen phone and business-document tasks and verify names, addresses, and expiry dates match.
  4. 4Submission and statusSubmit in the requested format and track Pending, Approved, or Resubmission Required.

You are done when

Required verification tasks show as complete and the relevant application or company action is available.

Checklist

  • All document corners and text are readable
  • Profile and document details match
  • The connected profile is public and yours
03 · Shared

Notifications, chat, and schedule messages

Open the right activity, keep a record of agreements, and confirm schedule proposals after selection.

Before you start

  • Confirm that the related application or campaign exists.
  • Even without push permission, check the in-app notification list regularly.

Steps

  1. 1

    Open the linked activity

    A notification opens its related application, campaign, approval, or chat. Confirm the final state on that screen.

  2. 2

    Select the correct conversation

    Check the participant, campaign, latest message, and unread count before opening a thread.

  3. 3

    Review a schedule proposal

    Check date, start and end time, timezone, and proposer. Once accepted, verify that both sides see it as confirmed.

  4. 4

    Record material changes

    Keep changes to venue, benefits, deadline, and direct-payment date in chat so both parties have a record.

  5. 5

    Attach a file if needed

    Attach PDF or JPEG/PNG/WebP/HEIC/HEIF images up to 15 MB. Remove sensitive information first.

UI

Screen guide

Screens use test data for explanation. Labels may differ by app version and account state.

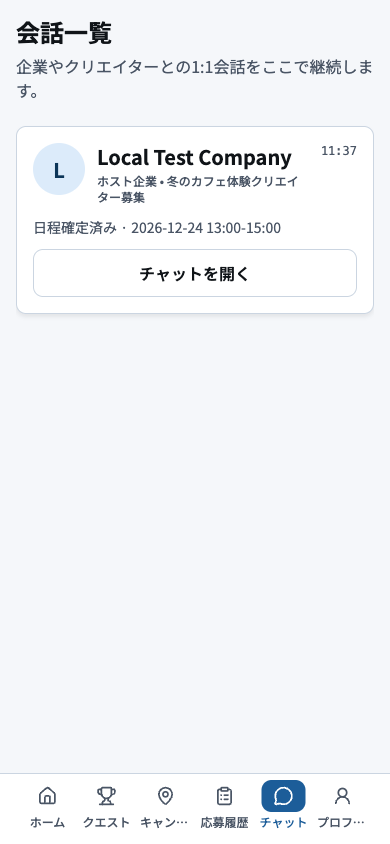
Chat list
Chat list
  1. 1Unread and latest messagePrioritize conversations with unread messages, schedule changes, or approaching deadlines.
  2. 2Campaign and participantMatch the participant and campaign before opening a thread to prevent cross-campaign messages.
  3. 3Bottom navigationUse the bottom navigation to leave chat after checking that no urgent unread item remains.
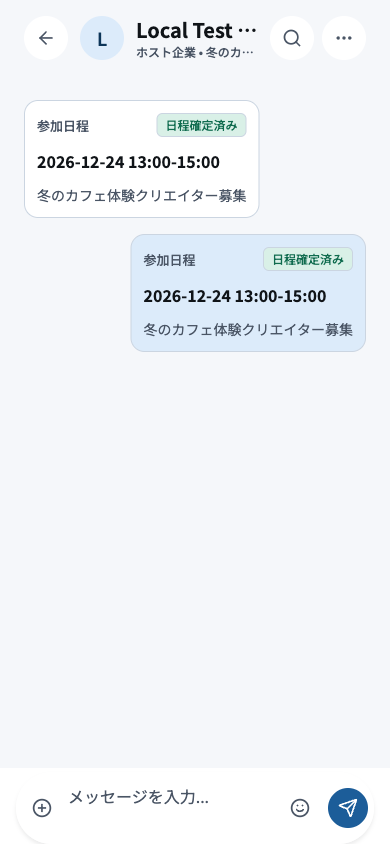
Chat detail
Chat detail
  1. 1Participant and campaignConfirm the participant and campaign at the top before writing or approving anything.
  2. 2Schedule proposalReview date, start time, end time, and timezone before accepting or requesting a change.
  3. 3Agreement messagesRecord venue, benefits, posting deadline, and payment date so both parties retain the agreement.
  4. 4Compose, attach, and sendAttach only necessary files, review the message, send once, and wait for confirmation.
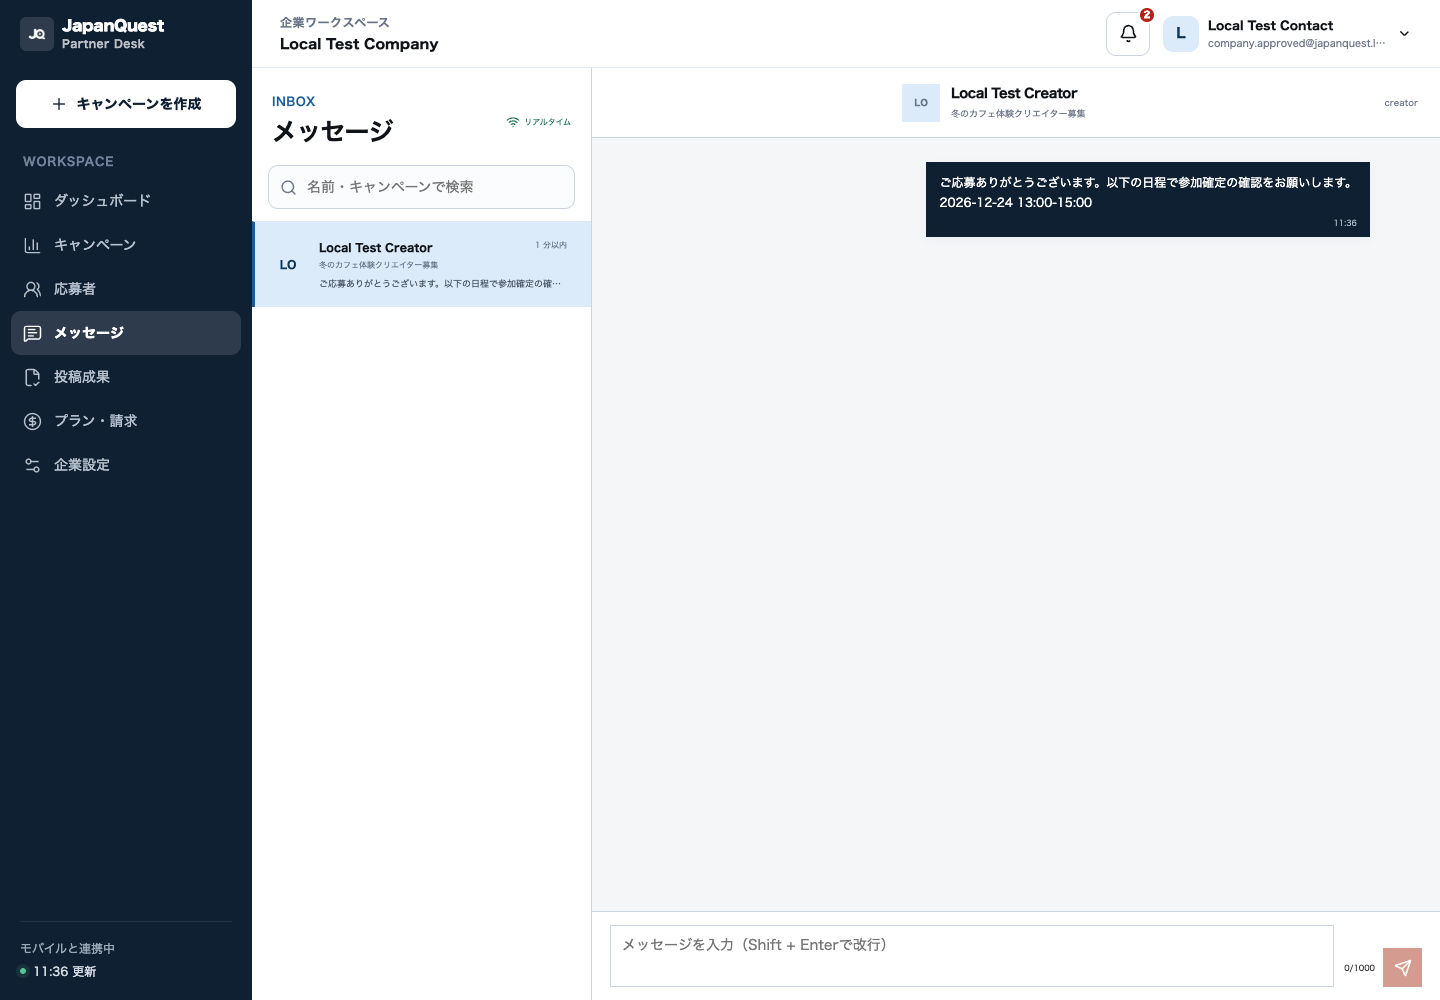
Partner Desk chat
Partner Desk chat
  1. 1Conversation listSelect work by unread state and update time, and check the list for conversations without an owner.
  2. 2Selected participantVerify the creator and campaign shown here before responding on behalf of the company.
  3. 3Message historyReview prior agreements, schedule changes, and files to avoid duplicate or contradictory guidance.
  4. 4Compose and sendRemove internal or sensitive data, then send only the information needed by the creator.

You are done when

Unread activity is cleared and both parties can see the agreed schedule and important terms in the thread.

Checklist

  • The conversation belongs to the correct campaign
  • Date, time, and timezone match
  • Important terms are not only agreed verbally
04 · Shared

Settings, language, and account management

Manage the display language, legal documents, guides, sign-out, and account deletion safely.

Before you start

  • Confirm that you are signed in to the correct account and role.
  • Before considering deletion, review active transactions and outstanding obligations.

Steps

  1. 1

    Open Settings

    Open Settings from your profile or navigation. Companies can also launch Partner Desk from mobile Settings.

  2. 2

    Change the display language

    Choose Japanese, English, Korean, or Chinese under Language. After the interface changes, recheck dates and important terms in the selected language.

  3. 3

    Review guides and legal documents

    Open role guides or the complete manual under Tutorials and guides. Under Legal documents, review the Terms and Privacy Policy that apply to your current role.

  4. 4

    Log out

    Log out after using a shared device. The saved session ends and the login screen returns.

  5. 5

    Resolve obligations before deletion

    Companies should review active campaigns, unreviewed UGC, billing, and payments. Creators should review applications, accepted work, unsubmitted deliverables, Wallet claims, and direct payments. Deletion does not cancel outstanding obligations.

  6. 6

    Delete the account

    Read the retention notice, acknowledge that deletion cannot be undone, and complete the final confirmation. If prompted for an Apple-linked account, also finish Apple verification.

UI

Screen guide

Screens use test data for explanation. Labels may differ by app version and account state.

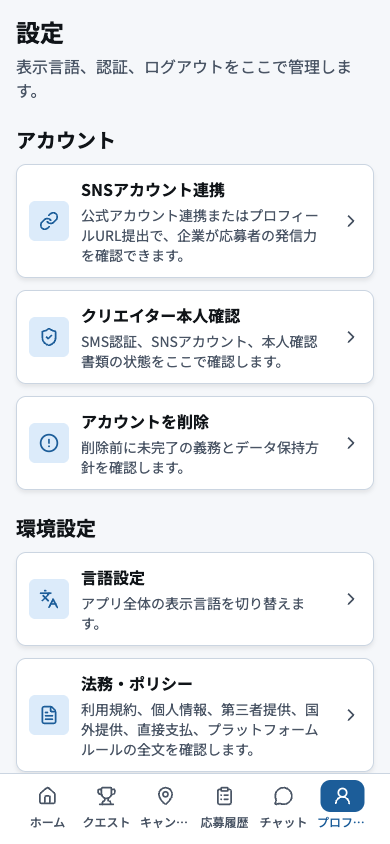
Creator settings
Creator settings
  1. 1Social account connectionConnect active social accounts and public URLs, removing or updating obsolete connections.
  2. 2Identity verificationTrack phone and identity checks, correcting only the item named in a resubmission notice.
  3. 3Delete accountResolve active campaigns, submissions, and payments before starting irreversible account deletion.
  4. 4Display languageChange the interface language and recheck important dates and conditions after switching.
  5. 5Legal and policiesRead the terms, privacy notice, and direct-payment notice that apply to the current role.
Company settings
Company settings
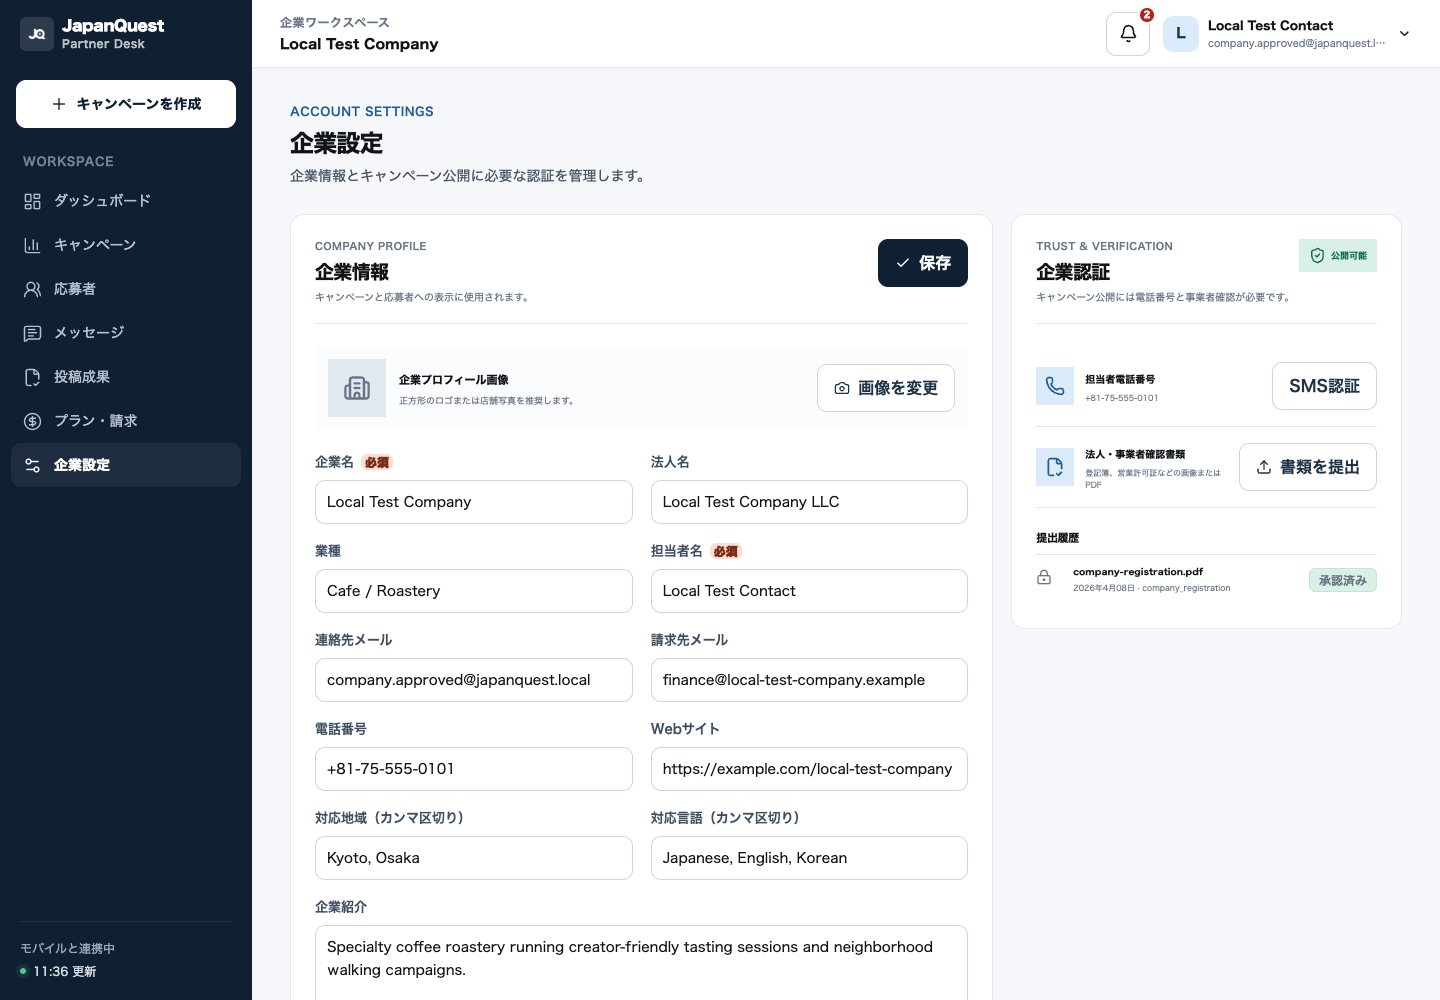
  1. 1Basic profileKeep the public company name, description, and category accurate and current.
  2. 2Business verificationCheck legal name, address, and document status; correct only the item named in a resubmission notice.
  3. 3Branch and contact detailsMaintain active locations and operator contacts, removing closed branches and obsolete details.

You are done when

The selected language and settings take effect, and any requested sign-out or deletion is handled according to the confirmation shown.

Checklist

  • The terms match the current role
  • You logged out on a shared device
  • Campaign, deliverable, billing, and payment obligations were reviewed before deletion
05 · For creators

Find and compare campaigns

Use Home and Map to find opportunities and compare requirements before applying.

Before you start

  • Add your working region and languages to your creator profile.
  • Browsing is available first; applying requires the shown verification and social setup.

Steps

  1. 1

    Review Home

    See recommendations, application status, wallet summary, and setup tasks. Use the bottom navigation to switch areas.

  2. 2

    Search with Map and filters

    Filter by keyword, region, category, and date. Map pins and list cards refer to the same campaigns.

  3. 3

    Read every condition

    Check company, venue, benefits, reward, eligibility, capacity, application deadline, result date, schedule, and posting deadline.

  4. 4

    Review the company profile

    Open the company profile from campaign details and check business information, branches, languages, and active campaigns. If you open a Home announcement, read its context and destination before continuing.

  5. 5

    Confirm content requirements

    Check platform, format, video duration, keywords, hashtags, ad disclosure, and submission method.

  6. 6

    Understand your costs

    Review travel, reimbursement, excluded items, companions, tax, and invoicing. Ask before applying if anything is unclear.

UI

Screen guide

Screens use test data for explanation. Labels may differ by app version and account state.

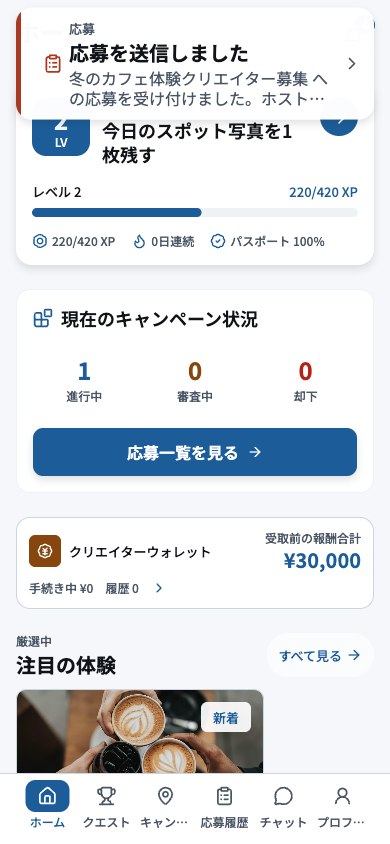
Creator home
Creator home
  1. 1New notificationPrioritize new selection, schedule, chat, and submission-deadline notifications.
  2. 2Activity and readinessComplete identity, profile, or other readiness items that still block applications.
  3. 3Application summaryReview active, selected, and submission-due counts and open the next required action.
  4. 4Wallet and recommendationsReview compensation tracking and recommendations; actual payment comes directly from the company.
  5. 5Creator navigationMove to discovery, applications, chat, or profile from the creator navigation.
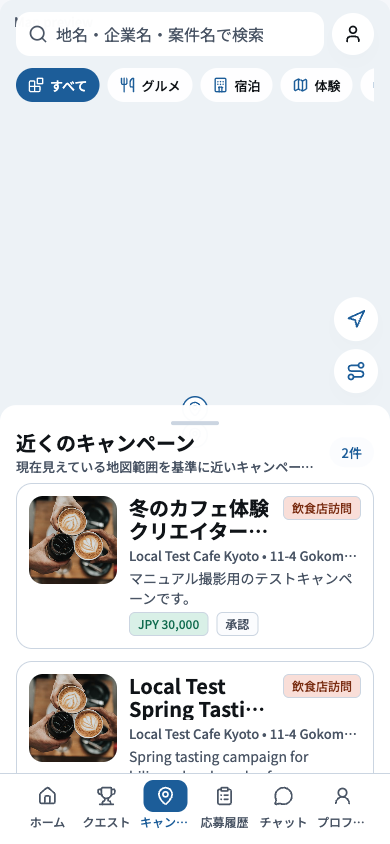
Find campaigns on the map
  1. 1SearchSearch by venue, area, or keyword to narrow the available campaigns.
  2. 2FiltersApply category, schedule, and eligibility filters, and remember which filters are active.
  3. 3Map and campaign cardMatch the map pin to its campaign card and check location and travel distance before opening details.
  4. 4Bottom navigationMove to home, applications, chat, or profile from the primary navigation.
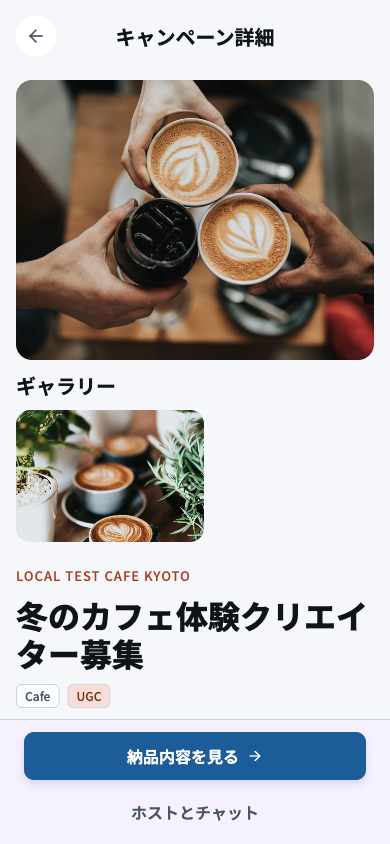
Campaign detail
Campaign detail
  1. 1Company, venue, and openingCheck company, venue, recruitment period, and activity date to confirm you can participate.
  2. 2Benefits and rewardReview the benefits, reward amount, direct-payment method, and agreed payment date.
  3. 3Eligibility and deliverablesCheck eligibility, required social network, format, ad disclosure, and submission deadline one by one.
  4. 4Apply actionRead every condition before applying and confirm the campaign is still open and not full.

You are done when

You can explain the schedule, required work, benefits, compensation, and your own costs for the campaign.

Checklist

  • Application and posting deadlines are not confused
  • Payment method and date are understood
  • The required platform is available
  • Travel is safe and feasible
06 · For creators

Apply to a campaign

Confirm readiness, enter a preferred schedule and motivation, submit, and track the result.

Before you start

  • Complete required identity, phone, and social-account checks.
  • Review campaign and direct-payment terms and choose feasible times.

Steps

  1. 1

    Open the application

    Read the full detail page and confirm applications are still available before opening the form.

  2. 2

    Choose a schedule

    Select a fixed slot, or enter a date and start/end time when scheduling is negotiated.

  3. 3

    Write your motivation

    Explain your audience, content idea, and fit with this campaign. Avoid a generic one-line answer.

  4. 4

    Acknowledge direct payment

    Confirm that the company pays you directly and JapanQuest does not hold, transfer, or guarantee compensation.

  5. 5

    Review and submit once

    Check campaign, schedule, motivation, and social account. Submit once and wait for confirmation.

  6. 6

    Track it in Applications

    Watch Applied, Reviewing, Confirmation requested, Accepted, Rejected, and Completed status and notifications.

UI

Screen guide

Screens use test data for explanation. Labels may differ by app version and account state.

Campaign detail
Campaign detail
  1. 1Company, venue, and openingCheck company, venue, recruitment period, and activity date to confirm you can participate.
  2. 2Benefits and rewardReview the benefits, reward amount, direct-payment method, and agreed payment date.
  3. 3Eligibility and deliverablesCheck eligibility, required social network, format, ad disclosure, and submission deadline one by one.
  4. 4Apply actionRead every condition before applying and confirm the campaign is still open and not full.
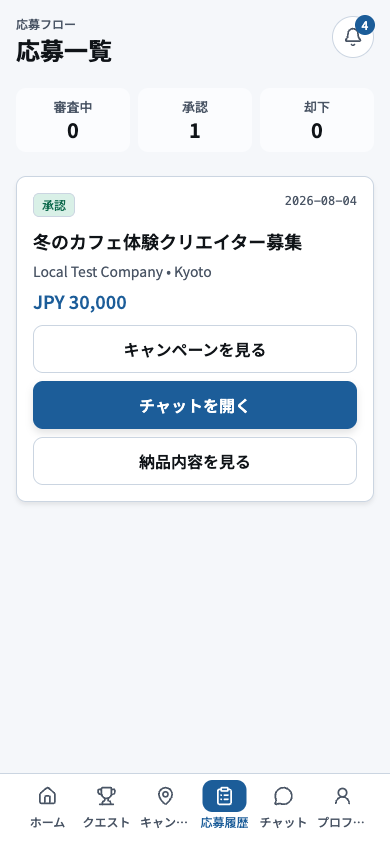
Application status
Application status
  1. 1Status filterFilter by Applied, In Review, Selected, or Completed to focus the list.
  2. 2Application cardVerify campaign, company, date, and current state before opening an application.
  3. 3Schedule, chat, and deliverable actionsUse the action shown for the current state: schedule response, chat, or deliverable submission.
  4. 4Bottom navigationBefore leaving, check for unread or time-sensitive actions on the application.

You are done when

The campaign appears in Applications with an Applied or Reviewing state.

Checklist

  • Schedule is feasible
  • Motivation is campaign-specific
  • Direct-payment terms are understood
  • No duplicate submission was made
07 · For creators

After selection: chat, schedule, and visit

Move from acceptance to a confirmed schedule, safe fulfillment, and content preparation.

Before you start

  • Confirm Accepted or Confirmation requested in Applications.
  • Reread the campaign terms and company messages.

Steps

  1. 1

    Recheck the acceptance

    Verify campaign, company, reward, benefits, and posting deadline match what you applied to.

  2. 2

    Respond to the schedule

    Check date, start/end times, and timezone. Accept or request an adjustment, then verify the confirmed state.

  3. 3

    Keep operating terms in chat

    Confirm meeting point, contact, emergency method, filming area, companions, excluded costs, and payment date.

  4. 4

    Attend as registered

    The registered creator attends or receives the item at the confirmed time and follows venue and safety rules.

  5. 5

    Report changes early

    For delay, illness, or disruption, message the reason and an alternative. Avoid no-shows.

  6. 6

    Recheck before posting

    Confirm ad disclosure, prohibited claims, required assets, publishing deadline, and URL submission method.

UI

Screen guide

Screens use test data for explanation. Labels may differ by app version and account state.

Application status
Application status
  1. 1Status filterFilter by Applied, In Review, Selected, or Completed to focus the list.
  2. 2Application cardVerify campaign, company, date, and current state before opening an application.
  3. 3Schedule, chat, and deliverable actionsUse the action shown for the current state: schedule response, chat, or deliverable submission.
  4. 4Bottom navigationBefore leaving, check for unread or time-sensitive actions on the application.
Chat detail
Chat detail
  1. 1Participant and campaignConfirm the participant and campaign at the top before writing or approving anything.
  2. 2Schedule proposalReview date, start time, end time, and timezone before accepting or requesting a change.
  3. 3Agreement messagesRecord venue, benefits, posting deadline, and payment date so both parties retain the agreement.
  4. 4Compose, attach, and sendAttach only necessary files, review the message, send once, and wait for confirmation.

You are done when

Both sides see the confirmed schedule and can review fulfillment and posting terms in chat.

Checklist

  • Schedule is in your calendar
  • Filming rules are known
  • Changes are recorded
  • Ad disclosure is included
08 · For creators

Submit posts, report results, and track payment

Submit public URLs and files, report metrics, and review direct-payment status.

Before you start

  • Publish with the required ad disclosure and confirm the post is public.
  • Check the deadline, required links/files, and metric reporting time.

Steps

  1. 1

    Open the correct submission

    Open Deliverables from the application or chat and verify the campaign title.

  2. 2

    Add public URLs

    Add an HTTPS public URL with a platform label. Up to 10 public links are supported.

  3. 3

    Add deliverable files

    Add PDF, image, MP4, or MOV files up to 50 MB each and up to 10 deliverables. Wait for upload completion.

  4. 4

    Review notes and content

    Add publication time and context, then open every URL and file before submitting.

  5. 5

    Report performance

    Enter requested reach, impressions, likes, saves, shares, comments, or clicks and add up to five evidence images.

  6. 6

    Review Wallet

    Track estimated, reviewing, or paid labels and campaign details. Payment is made directly by the company; ask after the agreed date if overdue.

UI

Screen guide

Screens use test data for explanation. Labels may differ by app version and account state.

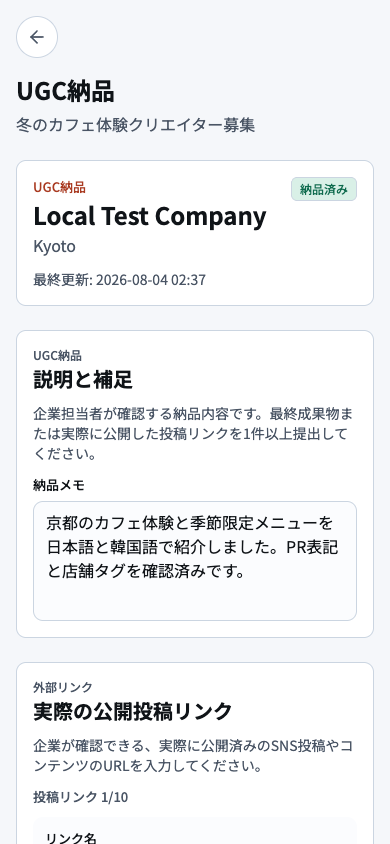
Submit deliverables
Submit deliverables
  1. 1Campaign and submission stateConfirm campaign, due date, and whether the submission is Draft, Saved, or Submitted.
  2. 2Note to companyAdd only the publication time and information the company needs to review.
  3. 3Public URL and resultsEnter public URLs and metrics, then test every link in a signed-out browser.
  4. 4Add files, save, and submitUpload the correct files, wait for completion, review the saved result, and submit once.
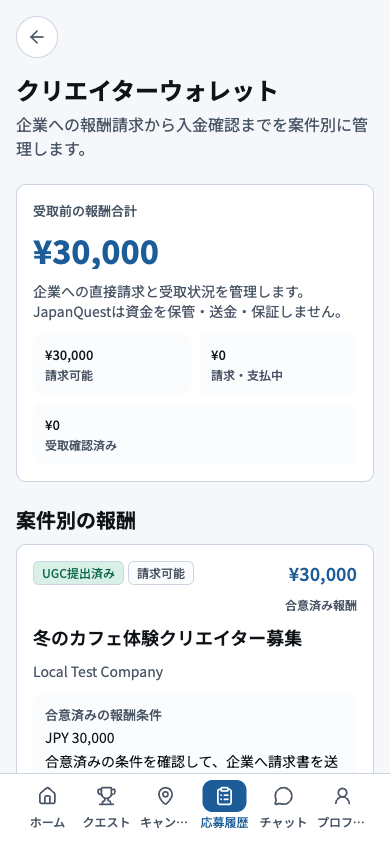
Compensation tracker
  1. 1Reward summaryReview expected, pending, and paid compensation totals.
  2. 2Amounts by stateCompare amounts by state and identify campaigns that have passed the agreed payment date.
  3. 3Campaign detailMatch each campaign amount with the company and agreed payment date and method.
  4. 4Ask company or report an issueAsk the company in chat first; if unresolved, report with the application ID and evidence.

You are done when

URLs, files, and required metrics are visible in the submission for company review.

Checklist

  • URLs work while signed out
  • Ad disclosure is visible
  • Files belong to this campaign
  • Metric capture time is recorded
09 · For creators

Profile, social accounts, Creator Kit, and quests

Maintain the profile companies review, social connections, Creator Kit, application readiness, and quest evidence.

Before you start

  • Prepare your display name, bio, location, languages, categories, and primary social profiles.

Steps

  1. 1

    Review the public profile

    Make sure image, display name, bio, region, languages, categories, and experience help a company evaluate fit.

  2. 2

    Keep social accounts current

    Check connected platforms, public profile URLs, and follower information. Remove or update obsolete connections.

  3. 3

    Use Creator Kit

    Review saved assets and quality-checked work. Open the photo, blog, caption, short-video, application, or disclosure starter template, confirm its intended use, and adapt it to your own experience.

  4. 4

    Resolve setup gaps

    Use Verification to complete missing phone, identity, profile, and social tasks.

  5. 5

    Complete quests

    Read the goal, deadline, mission code, and evidence requirement, then submit the requested URL or image. Images support JPEG/PNG/WebP/HEIC/HEIF up to 12 MB.

  6. 6

    Recheck privacy

    Do not expose home address, identity documents, private phone, or unrelated personal data in public profiles, Kit assets, or evidence.

UI

Screen guide

Screens use test data for explanation. Labels may differ by app version and account state.

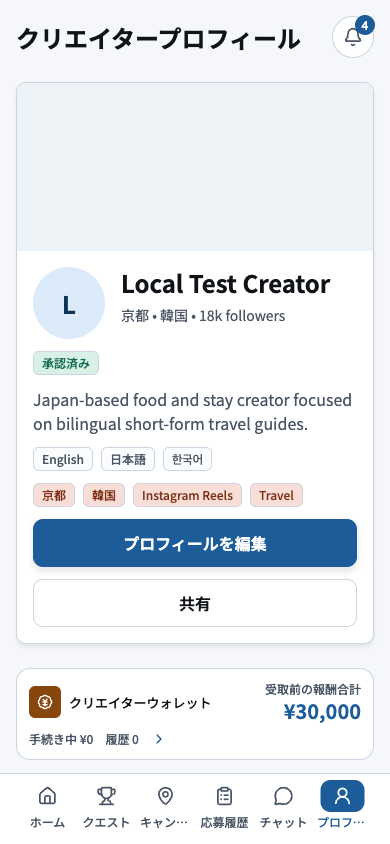
Creator profile
Creator profile
  1. 1Public profileCheck the photo, display name, bio, location, languages, and categories visible to companies.
  2. 2Edit and shareEdit or share the profile, then review the public result for layout and content errors.
  3. 3Experience and walletOpen experience and compensation records, and confirm only appropriate achievements are public.
  4. 4Settings and verificationOpen social connections, verification, language, and legal settings from here.
Creator verification progress
  1. 1Overall progressUse completed and remaining counts to estimate what must be done before applying.
  2. 2Application readinessCheck whether applications are currently enabled and which requirement is blocking readiness.
  3. 3Required checksComplete outstanding phone, identity, profile, and social checks from the top down.
  4. 4Task actionsOpen each action to submit or correct it, then return and confirm the status changed.
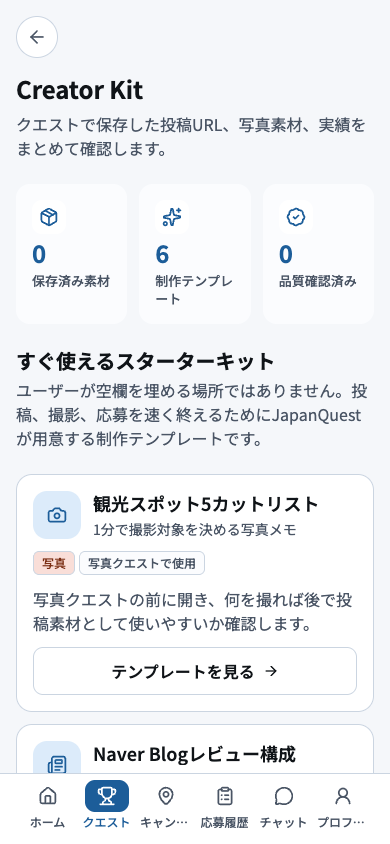
Creator Kit
Creator Kit
  1. 1Saved, template, and verified countsReview counts for saved assets, available templates, and quality-checked work.
  2. 2Ready-to-use starter kitIf starting for the first time, choose only the materials needed from the starter kit.
  3. 3Templates grouped by useFind a template that matches the intended photo, video, copy, or application task.
  4. 4Open the template detailsRead its purpose and cautions, then adapt it to the real experience before using it.

You are done when

Companies can review a current profile and social presence, Creator Kit assets support production, and required application setup is complete.

Checklist

  • Image and bio are current
  • Social links open
  • Kit templates were adapted to the actual experience
  • Personal data is minimized
  • Quest evidence matches the requirement
10 · Reference

Frequently asked questions

Answers about accounts, applications, campaigns, payments, posts, and languages.

01Can I use both roles?

Your selected role determines the account journey. If you need the other role, contact support with your current registration details.

02Can I change the language?

Yes. Choose Japanese, English, Korean, or Chinese in app Settings or the Help Center header. Japanese is the source edition.

03How do I withdraw an application?

Check its state and schedule, then notify the company in chat when available. If no action is shown, contact support with the application ID.

04Can a confirmed schedule change?

Before confirmation, respond to the proposal. After confirmation, contact the other party early and preserve the new agreement in chat.

05Does JapanQuest pay creator rewards?

No. The company pays the creator directly. JapanQuest does not hold, transfer, or guarantee the reward.

06A company requested a post revision. What should I do?

Compare it with the original requirements. Fix in-scope omissions, but preserve evidence and do not accept undisclosed extra work or removal of ad disclosure.

07What files can I upload?

Verification accepts PDF/JPEG/PNG/HEIC/HEIF up to 15 MB; chat accepts PDF/images up to 15 MB; UGC accepts PDF, images, MP4/MOV up to 50 MB. Follow the latest screen.

08Why can’t my company publish?

Check business and phone verification, required fields, moderation feedback, subscription status, and remaining publishing quota.

09Can I delete my account?

Use account deletion in Settings, or the public account deletion page if you cannot sign in. Follow any retention notice for active transactions or legal obligations.

10I received an inappropriate request.

Get to safety, preserve chat, time, campaign, and URL evidence, and contact support@jp-quest.com. Use local emergency services for immediate danger.

Checklist

  • If the answer is not enough, use the troubleshooting guide and the related task guide.
11 · Reference

Troubleshooting

A safe diagnostic order for sign-in, SMS, stale data, uploads, applications, publishing, schedules, and payment.

01Cannot sign in

Check connectivity → fully close and reopen the app → choose the same sign-in method → enable automatic device time → save the error and time if it persists.

02SMS code did not arrive

Check country code and number → signal and spam settings → do not send repeatedly → enter only the newest code. Never share it.

03A screen or list is stale

Check connectivity → refresh → visit another screen → sign in again. Do not repeat a submit action before checking its state.

04A file will not upload

Check supported format, size, file integrity, and device permission. Use a simple filename and reduce media size while preserving required quality.

05Application button is unavailable

Check whether the campaign is closed or full, then verify identity, phone, social connection, eligibility, and any existing application.

06Company cannot publish

Check business verification, phone, plan, remaining quota, required fields, and moderation feedback. Save a draft first.

07The schedule differs

Compare the latest proposal, confirmed state, and timezone in chat. Confirm both parties accepted the same slot.

08Company cannot open the post URL

Check post visibility, copied URL, and login requirements. Test in a signed-out browser and resubmit.

09Direct payment is overdue

Check agreed amount, date, and method → ask the company in chat → if unanswered, contact support with application ID and evidence.

10Suspected compromise or danger

Change sign-in credentials and end sessions where possible. Stop sharing data or sending money, preserve evidence, and report. Contact police or local emergency services when urgent.

You are done when

You avoid repeated risky actions and can provide a clear diagnosis and safe evidence for the next step.

Checklist

  • App version, device, OS, and time recorded
  • Sensitive data hidden in screenshots
  • No duplicate submission or payment
JAPANQUEST SUPPORT

Still need help?

Contact us with your registered email, campaign name, time of the issue, and a screenshot. Never send a password or verification code.

support@jp-quest.com

https://app.jp-quest.com/en/support/